



Forespar Whisker Poles — Rigging & Jibing Instructions

Forespar's practical guide to whisker poles: sizing to your headsail, mast fittings and storage, rigging the topping lift and guys, setting and trimming the pole, jibing safely and looking after twist-lock and Line Control poles.

Sizing the Pole
- Length = 100% of the foot of the headsail being flown (tack to clew), with some overlap: a pole telescoped to its maximum is at its weakest.
- Diameter is a major function of strength: a 2-1/2" tube is as much as 70% stronger than a 2" tube.
- The labels on the poles state the maximum boat size; Forespar cannot warranty poles that are too small for the boat per its sizing chart.
- Do not use any pole fully extended with large overlapping genoas in medium to heavy air (15-18 knots apparent and above).
- Boats with relatively heavy displacement or bowsprits should use the next larger pole; offshore and blue-water boats should seriously consider going up one size.
- Telescoping whisker poles cannot take the tack load of an asymmetrical spinnaker: a fixed-length, larger diameter pole (Forespar carbon "Bow Poles", custom-built) is needed for that. They can hold out the clew of an asymmetrical.
Working jib
| Boat length | Light to mod. air | Mod. to heavy air |
|---|---|---|
| Up to 16 ft. | ADJ 4'–8' | ADJ 6'–12' |
| Up to 22 ft. | ADJ 6'–12' | HD 6'–12' |
| Up to 25 ft. | HD 6'–12' | HD 6'–12' |
| Up to 28 ft. | ADJ 7'–15' | ADJ 7'–15' |
| Up to 33 ft. | LC 10'–18' | LC 10'–18' |
| Up to 35 ft. | LC 12'–22' | LC 12'–22' |
| Up to 46 ft. | LC 13'–24' | LC 13'–24' |
| Up to 55 ft. | LC 15'–27' | LC 15'–27' |
Genoa
| Boat length | Light to mod. air | Mod. to heavy air |
|---|---|---|
| Up to 16 ft. | ADJ 6'–12' | HD 6'–12' |
| Up to 22 ft. | HD 6'–12' | HD 6'–12' |
| Up to 25 ft. | ADJ 7'–15' | ADJ 7'–15' |
| Up to 28 ft. | LC 10'–18' | LC 10'–18' |
| Up to 33 ft. | LC 12'–22' | LC 12'–22' |
| Up to 35 ft. | LC 13'–24' | LC 13'–24' |
| Up to 46 ft. | LC 13'–24' | LC 15'–27' |
| Up to 55 ft. | LC 15'–27' | Carbon fiber custom poles |
General guideline based on boat length, sail choice and wind conditions.
Mast Eyes, Track & Storage
Mast eye or track
- ADJ 4-8 and ADJ 6-12 twist-lock poles come with a mast pad eye (PE-1) sized for them: use only this eye with these poles.
- HD 6-12 DL and ADJ 7-15 DL poles need a PE-3-SF flat base (#400001) or PE-3-SC curved base (#400002) stainless steel mast pad eye, sold separately (the checklist page prints "ADJ 7-17", as printed).
- Mount a fixed eye on the forward centerline of the mast, at the height of the headsail clew so the pole flies level; with different clew heights consider two eyes, one high and one low.
- 1-1/4" or 1-1/2" "T" track is much stronger than a single eye and lets you adjust the inboard height. On boats up to 25' a fixed eye may be sufficient.
Storing the pole
- Options: deck chocks, vertically up the mast, stanchion chocks, or below on small boats.
- Vertical mast storage: only the FC-125 flange car (#332002) with piston/latch ends (EL, XP, TR and Ultra UXP, UTR), or the T-125-S (#333004) or AT-125-S (#334002) toggle cars with TS and UTS socket ends. Ring cars do not work.
- Track height: at least one foot more than the stored length of the pole; the track can start about 3 feet off the deck. Inboard end up, outboard end down.
- Vertical Pole Storage Car (VPC), linked under the mast car by a short tail, holds the pole on the mast centerline and stops it rattling. A DC-2 (#300002) chock goes on the mast just above the boot (not on deck), on a teak or oak pad shaped to the mast if needed.
- Offshore: keep deck chocks ready and bring the pole down to the deck in bad weather. Do not use stanchion chocks offshore.
Rigging & Trimming
- A topping lift is needed to support the pole, especially in light air; use a staysail or second jib halyard if there is no pole lift (a spinnaker halyard only briefly, as it chafes on the headstay).
- For short use, move the jib leads well forward and turn the lazy sheet on a forward cleat (as a turning block, not cleated) to hold the pole down and forward from the cockpit.
- For long periods (trade winds, night squalls) rig a separate after-guy and fore-guy, with the sheet running free through the outboard end: you can then furl and unfurl the jib without touching the pole.
- Larger Line Control poles have a center-pole wire strap: rig a small line bridle from it to the outboard end for the topping lift in heavy air (made to length by you).
- Fly whisker poles jaws down (spinnaker poles jaws up).
- Fly the pole level, on the opposite side to the main boom, at the same angle to the wind as the boom: as the main comes in, the pole goes out, and vice versa.
- Take the pole down when the headsail leech softens or the pole is too far forward (broad reach). Never fly it on the same side as the boom.
Typical Deployment Sequence
Pole stored on the mast
- Furl the jib first (or bear off). Never set or take down a pole under load.
- Attach the topping lift to the outboard end in the mast chock.
- Take the jib sheet and lift the end out of the chock; set the sheet in the end fitting so it runs free.
- Check aloft that the pole is on the mast centerline (especially with the FC-125 car) before walking it forward.
- Guide the pole down keeping the outboard end above the lifelines; lay it on the lifeline.
- Telescope to length, easing the topping lift as you do.
- Top the pole to height and set the mast car so the pole is level.
- Unfurl the headsail, sheet it back to the outboard end and trim to course.
Pole stored on deck
- Attach the topping lift to the outboard end fitting.
- Release the pole from the chocks.
- Set the sheet in the outboard end so it runs freely.
- Attach the pole to the mast fitting and lay it on the lifelines.
- Telescope to length.
- Top the pole with the topping lift.
- Set the mast car height to keep the pole level.
- Trim to course.
Mark the telescoping line, furling line and topping lift with waterproof marker lines (one for the #1 sail size, two for the #2, and so on) so you know how far to telescope for each headsail. Line Control poles: un-cleat the line, pull the line out to extend the pole, re-cleat the line.
They Just Don't Jibe
- Whisker poles can be as much as 80% longer than "J", so unlike spinnaker poles they should not be jibed: they must be retracted to pass inside the fore-triangle while the headsail passes through the same space.
- Safest method: furl the headsail, ease the topping lift and retract the pole, swap sheets at the outboard end, reset the pole on the new side, then unfurl.
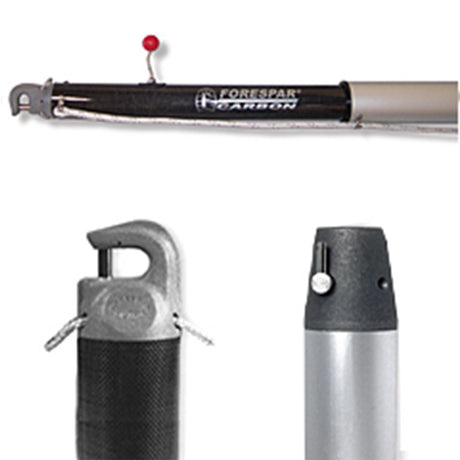
- UTR trigger-style outboard ends: pull the loop lanyard to cock the piston; it releases when the sheet depresses the trigger. Topping lift and downhaul go on the bridle loops top and bottom of the end. Always let the sheet run freely through the jaw – never attach the pole to the bowline loop.
Care, Maintenance & Parts Drawing
- No oils or spray lubricants on end fittings or tubes: twist-lock internals are permanently damaged by lubricants, and any component failure found lubricated voids the warranty. Ends are shipped without lubrication.
- Rinse regularly with fresh water; clean twist-lock poles with soapy fresh water; soak salted-up poles and end fittings in white vinegar.
- Never pull a pole back against a shroud or let it fly against the headstay: dents and bends from hitting stays are not covered under warranty and a dented pole may not telescope.
- Poles stored on the mast can be damaged by clew shackles (heavy clew patches, snap shackles on the sheets).

Need a part that isn't listed? Ask us to source it and quote the part number from the PDF.
Products in this Manual
-


Forespar Aluminum Complete Whisker Pole LC 15-27 (for 55 ft. Boat Max.) TS/UTR Ends
FOR405201
$2,879.96 USDList Price: $3,599.95 USDUnit price /Unavailable -
Forespar Aluminum Complete Whisker Pole LC 15-27 (for 55 ft. Boat Max.) TS/UXP Ends
FOR405200
$2,983.16 USDList Price: $3,728.95 USDUnit price /Unavailable -
Forespar Carbon/Aluminum Complete Whisker Pole LC 13-24 (for 46 ft. Boat Max.) UTS/UTR Ends
FOR403203
$3,819.00 USDUnit price /Unavailable -
Forespar Aluminum Complete Whisker Pole LC 13-24 (for 46 ft. Boat Max.) UTS/UTR Ends
FOR403202
$2,446.36 USDList Price: $3,057.95 USDUnit price /Unavailable -
Forespar Aluminum Complete Whisker Pole LC 13-24 (for 46 ft. Boat Max.) UXP/UXP Ends
FOR403200
$2,317.56 USDList Price: $2,896.95 USDUnit price /Unavailable -
Forespar Carbon/Aluminum Complete Whisker Pole LC 12-22 (for 35ft. Boat Max.) UTS/UTR Ends
FOR402203
$3,219.00 USDUnit price /Unavailable -
Forespar Aluminum Complete Whisker Pole LC 12-22 (for 35 ft. Boat Max.) UTS/UTR Ends
FOR402201
$1,983.16 USDList Price: $2,478.95 USDUnit price /Unavailable -
Forespar Aluminum Complete Whisker Pole LC 12-22 (for 35 ft. Boat Max.) UXP/UTR Ends
FOR402200
$1,651.16 USDList Price: $2,063.95 USDUnit price /Unavailable -
Forespar Aluminum Complete Whisker Pole LC 10-18 (for 33 ft. Boat Max.) EL/UTR Ends
FOR401107
$1,353.56 USDList Price: $1,691.95 USDUnit price /Unavailable -
Forespar Aluminum Complete Whisker Pole LC 10-18 (for 33 ft. Boat Max.) EL/UXP Ends
FOR401106
$1,327.16 USDList Price: $1,658.95 USDUnit price /Unavailable -
FOR406100
$194.36 USDList Price: $242.95 USDUnit price /Unavailable -
FOR404100
$147.96 USDList Price: $184.95 USDUnit price /Unavailable -
FOR404000
$134.36 USDList Price: $167.95 USDUnit price /Unavailable -
Forespar Aluminum Complete Whisker Pole (ADJ 7-15 DL) 83-169 In. (for 25 ft. Boat Max.) - 2 In. Dia.
FOR407101
$547.16 USDList Price: $683.95 USDUnit price /Unavailable -
FOR406300
$487.16 USDList Price: $608.95 USDUnit price /Unavailable -
FOR406000
$183.16 USDList Price: $228.95 USDUnit price /Unavailable