



Selden Reversible Winches R30, R40, R46 & R52 — Owner's Manual

Operation, installation and normal and extended service for the discontinued Selden R30, R40, R46 and R52 reversible self-tailing winches, which ease the line out with the R-winch handle.

Technical Data
Discontinued model – documents and spare parts as printed.
| Winch | Art. No. | Base Ø D mm | Drum Ø d mm | Height H mm | Weight kg | Line mm | Ratio high / low | MWL |
|---|---|---|---|---|---|---|---|---|
| R30 | 470-530-10 | 143 | 90 | 178 | 4.4 | 8-12 | 10:1 / 30:1 | 900 kg (1984 lb) |
| R40 | 470-540-10 | 151 | 90 | 180 | 4.9 | 8-12 | 10:1 / 40:1 | 900 kg (1984 lb) |
| R46 | 470-546-10 | 178 | 103 | 198 | 6.3 | 10-14 | 10:1 / 46:1 | 1000 kg (2204 lb) |
| R52 | 470-552-10 | 192 | 110 | 216 | 7.3 | 10-14 | 10:1 / 52:1 | 1300 kg (2866 lb) |

Winching
- 2-3 turns clockwise, then over the self-tailing arm into the jaws for ¾ of a lap and lock it in the guide.
- Fast gear: handle clockwise. Low gear: handle anti clockwise.
Reversing
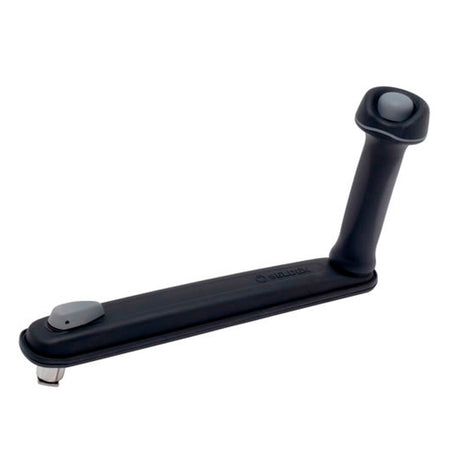
- Only with the R-winch handle 533-927-10 (the S-winch handle is 533-927-20).
- Hold the thumb button, push the handle slightly anticlockwise to disengage the fast-gear clutch, then turn clockwise: the line eases out while it is loaded and the handle keeps turning, staying in the jaws.
Fasteners
| Winch | Screw/thread | Through deck | Thread drill | Template |
|---|---|---|---|---|
| R30 | M6 | Ø 7 mm | Ø 4.9 mm | 595-687-E |
| R40 | M6 | Ø 7 mm | Ø 4.9 mm | 595-688-E |
| R46 | M8 | Ø 9 mm | Ø 6.5 mm | 595-689-E |
| R52 | M8 | Ø 9 mm | Ø 6.5 mm | 595-690-E |
Max bolt head W / Dmax: 10 mm (R30, R40), 13 mm (R46, R52); cheese headed screws are generally too large. Line entry 5-10º.
Two Methods
- Sliding hexagon bolts: no dismantling – slide the bolts with L-shaped washers into the base groove, fill the cavity and countersinks with sealant, nuts below, tighten crosswise.
- Allen screws from above: remove top plate, cover, arm, locator bracket, drum and base collar (3 clips), mark with the base or template, drill through or tap into metal inserts.
- Flat surface (shim if needed), no soft sandwich deck; insulate the base on steel, bronze or brass (0.5-1 mm plastic or sealant).
Normal Service
- Remove cap screw, top plate and top cover; lift the self-tailing arm off; undo three screws and remove the locator bracket.
- Lift drum and jaws straight up (R30/R40: keep the composite hub on the base); unclip the base collar; remove the lower roller bearing and washer.
- Clean with a dry cloth or white spirit; grease (Selden 312-501) only the upper and lower gear rings in the drum, the twin gear shaft and twin gear teeth.
- Grease nowhere else. Reassemble with the arm guiding the line to the cockpit.
Extended Service
- Remove shaft and twin cog wheel, then the asymmetric washer and ratchet wheel (note their orientation) and check the pawls.
- Lift out the handle socket with bushings, the hub (R46/R52: cap screw first) and the upper gear wheel cone assembly; separate cone, lift pin, brake activator and drive shaft; clean and reassemble at once.
- Remove spirol and wave springs and the lower gear wheel assembly; check the four conical surfaces for uneven wear and the O-ring.
- Pawl holders: remove only if function is poor; holders from before 2016 must be replaced if removed. Pawl kit 470-074-01R (as printed).
- Refit the lower gear assembly and rotate the ratchet wheel about one turn anticlockwise so the notch opens the pawls.
Need a part that isn't listed? Ask us to source it and quote the part number from the PDF.
Products in this Manual
-


Selden Lubricating Grease (90 g) - for Furlex, Winches and Furling Masts
SELDEN-LUBRICATING-GREASE-TUBE-90-G
$20.99 USDUnit price /Unavailable -
Selden TWIN GEAR WHEEL REPL.KIT, R52
SELDEN-TWIN-GEAR-WHEEL-REPL-KIT-R52
$210.00 USDUnit price /Unavailable -
Selden TWIN GEAR WHEEL REPL.KIT, R46
SELDEN-TWIN-GEAR-WHEEL-REPL-KIT-R46
$210.00 USDUnit price /Unavailable -
Selden TWIN GEAR WHEEL REPL.KIT, R40
SELDEN-TWIN-GEAR-WHEEL-REPL-KIT-R40
$210.00 USDUnit price /Unavailable -
Selden TWIN GEAR WHEEL REPL.KIT, R30
SELDEN-TWIN-GEAR-WHEEL-REPL-KIT-R30
$210.00 USDUnit price /Unavailable -
Selden Spare Pawl Kit for Reversible R30-R52 Winches. Production Years 2011-2018
SELDEN-PAWL-KIT-R30-R52-2011-2018
$60.95 USDUnit price /Unavailable -
Selden Winch Handle - 10 in. / Aluminum / Ball Grip / Locking / Reversible
SEL53392710
$89.95 USDUnit price /Unavailable